Showing posts with label authentication. Show all posts

04 February, 2020

Azure Active Directory- Restrict Application Access To Users or A Group

Azure Active Directory- Restrict Application Access To Users or A Group

This article will show, how you can restrict your app for the give users/group only. Once you are done with app registrations then you can use the Enterprises Application sections to provision access to allowed users only or users existing under the group.

Azure Ad Group

Azure Active Directory offers a mechanism to use groups to manage access to cloud-based web apps, on-premises apps, and other resources. For example Software as a Service (SaaS) apps, Azure services, SharePoint sites, and on-premises resources.

See this Angular 8 App With Azure Active Directory Authentication post for the step by step registrations flow if you are not aware.

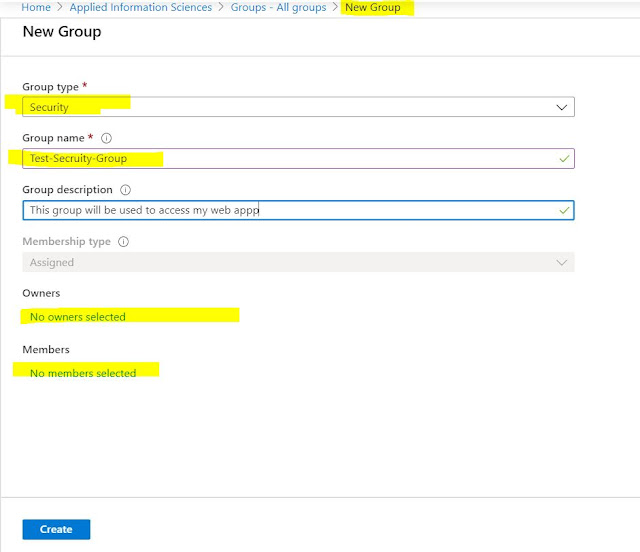
Create an Azure Ad Group (Security):

  1. Log in to the Azure portal with an administrator account if you are not admin then take help from your concern admin team. (mostly normal user can not create the group)
  2. Click on the All services item on the main menu or Find Azure Active Directory in the left panel.
  3. Choose the directory you are using for the application.
  4. Choose Groups >> New Group
  5. Choose the Group Type to Security
  6. Provide a meaning full group name
  7. Add users under the member's sections that you are going to allow to access your application
  8. Click on Create button 
Create Azure Ad Security Group

How to Configure the Application?

Follow the following steps to configure your app:
  1. Log in to the Azure portal with your account(an administrator account will be required but you can take help from your Cloud Admin/DevOps Team) or as an owner of the app under Enterprise apps.
  2. Click on the All services item on the main menu or Find Azure Active Directory in the left panel.
  3. Choose the directory you are using for the application.
  4. Click on the Enterprise applications tab.
  5. Select your application from the list of applications associated with this directory.
  6. Click the Properties tab.
  7. Change the User assignment required? toggle to Yes.
  8. Click the Save button at the top of the screen.
user-assignment-required


Assign Group to App


  1. To assign group(s) to an application directly, follow the steps below:
  2. Open the Azure portal and sign in as a Global Administrator or as a non-admin application owner with an Azure AD Premium license assigned is required
  3. Select  “Azure Active Directory”  in Left Panel to open.
  4. Click Enterprise Applications from the Azure Active Directory left-hand navigation menu.
  5. Click All Applications to view a list of all your applications and filter  with your app name
  6. Select the application you want to assign a user to from the list.
  7. Click Users and Groups from the application’s left-hand navigation menu.
  8. Click the Add button on top of the Users and Groups list to open(filter your group name) the Add Assignment pane.
  9. Click the Users and groups selector from the Add Assignment pane.


Group assignment


Grant tenant-wide admin consent to an application :

Admin consent will be required because the application will be reading the user profile on behalf of the user. Only Global admin can grant the admin consent.
Visit MSDN for more information around the Admin consent.
17 January, 2020

Angular 8 Azure Active Directory Authentication

Angular 8 App With Azure Active Directory Authentication


Today we are going to use the Active Directory Authentication Library (ADAL) for angular 8/JavaScript (ADAL.JS) that offers Azure AD authentication services that can be incorporated in the single-page applications(SPA).

if you are new to Angular 8 so ahead have a look into the first angular 8 projects and then go through the step by steps and instructions to implement authentication.

Step 1: Configuring Azure Active Directory (App Registrations)

  • Login to Azure Portal
  • Click on Azure Active Directory >> App Registrations >> New Registrations
  • Enter the display name
  • Select the supported account type(in my case Single Tenant App)
  • Enter the Redirect URI( default URL for the angular https://localhost:4200/)
  • Click on Register button

AAD-App registrations

  • Find newly created app under app registrations "angular-app-web-dev" and click on Authentication in left panel >> under Implicit grant >>  ID tokens tick the checkbox >> click on the Save Button
AAD App Registration - Authentication Settings


Get the following details from registered App that can be found under Overview sections
  • Client Id - (GUID)
  • Tenant Id - (GUID)
AAD - ClientId and TenantId


Step 2 - Angular Project Updates for ADAL

Open the angular app in vscode and open the terminal  

Install the microsoft-adal-angular6 npm package

Run the following command to install ADAL package and this package will be added to your dependencies section in package.json:

 npm i microsoft-adal-angular6 --save

Update environment.ts file with the following details

Just the end of step -1 we got the tenant id and client Id
    
    tenantId: 'c71b45bc-73d9-4208-95bb-1f5b7dd22cbf',  // replace with yours one here
    clientId: '73d9-4208-95bb-49cd-c71b45bc-73d9-4208', // replace with yours one here
    redirectUri: 'https://localhost:4200', // replace with the yours one here
    postLogoutRedirectUri: 'https://localhost:4200/logout', // replace with yours one here
    extraQueryParameter: 'nux=1' //(optional)
environment.ts

Update app-routing.module.ts  to secure individual route (your route modules)

Import the AuthenticationGuard  into your file

import { AuthenticationGuard } from 'microsoft-adal-angular6';

const routes: Routes = [
  { path: '', component: EmployeeComponent, canActivate: [AuthenticationGuard] } }
];

Update app.module.ts time with followings

Import the MsAdalAngular6Module, AuthenticationGuard into your file

import { MsAdalAngular6Module, AuthenticationGuard } from 'microsoft-adal-angular6';

add imports with the following configuration details

imports: [
    MsAdalAngular6Module.forRoot({
      tenant: environment.tenantId,
      clientId: environment.clientId,
      redirectUri: window.location.origin,
      // endpoints: environment.endpoints,
      navigateToLoginRequestUrl: false,
      extraQueryParameter: environment.extraQueryParameter,
      cacheLocation: 'sessionStorage'
    })
  ],

and also update the providers for the authentication gurad
  providers: [ 
    AuthenticationGuard
  ],

Display the Logged-in User Details

if you want to show the logged-in user details use the these properties


App-component.ts


this.adalSvc.LoggedInUserEmail // Get the Logged In User Email
this.adalSvc.LoggedInUserName // Get the Logged In User Name
this.adalSvc.logout() // Logs out the signed in user

You have done all the possible required steps, You do not have to call the login method it will be called implicitly.