Showing posts with label Azure. Show all posts

30 June, 2022

Connect to Azure SQL database using managed identity C# .Net 6.0

Connect to Azure SQL database using managed identity C# .Net 6.0

Let's discuss the connecting .net 6.0 c# application to azure SQL serve using MSI

.NET 6.0 applications are more flexible and require less work than other.NET frameworks, such as.NET Core 3.1,.NET 4.8, and so on.

Connect  .Net Core 3.1 or the Lower version Application to azure SQL

  you will be using the following package

Install-Package Azure.Identity

Install-Package System.Data.SqlClient


Connect .Net 6.0 Application to Azure SQL: 

you will be using only following the NuGet package with the new connection string

dotnet add package Microsoft.Data.SqlClient


 if you are using system-assigned identity MSI then uses the following connections string and code.(Local Machine)

using Microsoft.Data.SqlClient;

...

// Uncomment one of the two lines depending on the identity type    
SqlConnection connection = new SqlConnection(
    "Server=tcp:<server-name>.database.windows.net;Database=<database-name>;
Authentication=Active Directory Default;TrustServerCertificate=True"
    ); // system-assigned identity
// Open the SQL connection
connection.Open();


If you are using a user-assigned identity then use the following connecting string or code (Local Machine)


using Microsoft.Data.SqlClient;

...

SqlConnection connection = new SqlConnection(
    "Server=tcp:<server-name>.database.windows.net;Database=<database-name>;
Authentication=Active Directory Default;
User Id=<client-id-of-user-assigned-identity>;TrustServerCertificate=True");
    // user-assigned identity

// Open the SQL connection
connection.Open();

Set up your dev environment and Visual Studio

  • Visual Studio for Windows is integrated with Azure AD authentication. To enable development and debugging in Visual Studio, add your Azure AD user in Visual Studio by selecting File > Account Settings from the menu, and selecting Sign-in or Add.
  • To set the Azure AD user for Azure service authentication, select Tools > Options from the menu, then select Azure Service Authentication > Account Selection. Select the Azure AD user you added and select OK


To run your application on Azure App Service, you may need to use the connection string below


Since Microsoft.Data.SqlClient 2.1.0, the driver supports authentication to Azure SQL Database, and Azure SQL Managed Instance by acquiring access tokens via managed identity. To use this authentication, specify either Active Directory Managed Identity or Active Directory MSI in the connection string, and no password is required. You can't set the Credential property of SqlConnection in this mode either.

Below connection string for system-assigned identity :

// For system-assigned managed identity
// Use your own server and database.
string ConnectionString1 = @"Server=demo.database.windows.net;
Authentication=Active Directory Managed Identity; Database=employeedb";

using (SqlConnection conn = new SqlConnection(ConnectionString1)) {
    conn.Open();
}

string ConnectionString2 = @"Server=demo.database.windows.net;
Authentication=Active Directory MSI; Database=employeedb";

using (SqlConnection conn = new SqlConnection(ConnectionString2)) {
    conn.Open();
}

For the other pre-steps of SQL server configuration, see here

23 June, 2022

azure function error unknown argument --port

How to run Azure Function app on a different port in Visual Studio

or 

azure function error unknown argument --port


How to Fix it?

  • Update Project Properties -> Debug to following
  • put the following command  "host start --port 7071 --pause-on-error"


host start --port 7071 --pause-on-error


Finally, it works 


30 May, 2022

distributed messaging system and some common messaging scenarios


What is Distributed Messaging System?


Distributed messaging is based on the concept of reliable message queuing. Messages are queued asynchronously between client applications and messaging systems. A distributed messaging system provides the benefits of reliability, scalability, and persistence.

Most of the messaging patterns follow the publish-subscribe model (Pub-Sub) where the senders of the messages are called publishers and those who want to receive the messages are called subscribers.

Once the message has been published by the sender, the subscribers can receive the selected message with the help of a filtering option. 

Type of filtering

  •  topic-based filtering
  •  content-based filtering.

Note that the pub-sub model can communicate only via messages. It is a very loosely coupled architecture; even the senders don’t know who their subscribers are. Many of the message patterns enable with message broker to exchange publish messages for timely access by many subscribers. 

A real-life example is Netflix, amazon prime video, which publishes different channels like sports, movies, music, etc., and anyone can subscribe to their own set of channels and get them whenever their subscribed channels are available.


Some common messaging scenarios are:

Messaging. Transfer business data, such as sales or purchase orders, journals, or inventory movements.

Decouple applications. Improve reliability and scalability of applications and services. Client and service don't have to be online at the same time.

Topics and subscriptions. Enable 1:n relationships between publishers and subscribers.

Message sessions. Implement workflows that require message ordering or message deferral.

Here is an example of Azure Bus Service:


24 April, 2022

Azure Web Application Firewall?


Azure Web Application Firewall?

Azure Web Application Firewall (WAF) on Azure Application Gateway provides centralized protection of your web applications from common exploits and vulnerabilities. Web applications are increasingly targeted by malicious attacks that exploit commonly known vulnerabilities. SQL injection and cross-site scripting are among the most common attacks.

WAF on Application Gateway is based on Core Rule Set (CRS) 3.1, 3.0, or 2.2.9 from the Open Web Application Security Project (OWASP).

What problem it'll solve for your application( Features)?

  • SQL-injection protection.
  • Cross-site scripting protection.
  • Protection against other common web attacks, such as command injection, HTTP request smuggling, HTTP response splitting, and remote file inclusion.
  • Protection against HTTP protocol violations.
  • Protection against HTTP protocol anomalies, such as missing host user-agent and accept headers.
  • Protection against crawlers and scanners.
  • Detection of common application misconfigurations (for example, Apache and IIS).
  • Configurable request size limits with lower and upper bounds.
  • Exclusion lists let you omit certain request attributes from a WAF evaluation. A common example is Active Directory-inserted tokens that are used for authentication or password fields.
  • Create custom rules to suit the specific needs of your applications.
  • Geo-filter traffic to allow or block certain countries/regions from gaining access to your applications.
  • Protect your applications from bots with the bot mitigation ruleset.
  • Inspect JSON and XML in the request body

https://docs.microsoft.com/en-us/azure/web-application-firewall/media/ag-overview/waf1.png

Image Source: https://docs.microsoft.com/en-us/azure/web-application-firewall

Protection

  • Protect your web applications from web vulnerabilities and attacks without modification to back-end code.
  • Protect multiple web applications at the same time. An instance of Application Gateway can host up to 40 websites that are protected by a web application firewall.
  • Create custom WAF policies for different sites behind the same WAF
  • Protect your web applications from malicious bots with the IP Reputation ruleset
  • read more on MSDN

28 September, 2021

c# Copy an Azure Storage blob into Subfolder or Subdirectories

 Copying All Blob of given Container into the same container and under subfolder?

Here are few key points about the copying blob in Azure Storage Account:

  • When you copy a blob within the same storage account, it's a synchronous operation.
  •  When you copy across accounts it's an asynchronous operation.
  • The source blob for a copy operation may be a block blob, an append blob, a page blob, or a snapshot. If the destination blob already exists, it must be of the same blob type as the source blob. An existing destination blob will be overwritten.
  • The destination blob can't be modified while a copy operation is in progress. A destination blob can only have one outstanding copy operation. In other words, a blob can't be the destination for multiple pending copy operations.


To copy a blob, call one of the following methods:

  • StartCopyFromUri
  • StartCopyFromUriAsync

We are using  .Net Core 3.1

Step  1Install-Package Azure.Storage.Blobs -Version 12.10.0

Step 2:  use the following code to move your container (named images)file into the same container  under a subfolder name called 

for example, if your current file store in images/my-pic.png this code will move to images/my-folder/my-pic.png


private static async Task CopyBlobToSubFolderAsync(BlobContainerClient container)
{
    
        // Get the name of the first blob in the container to use as the source.
        string blobName = container.GetBlobs().FirstOrDefault().Name;

        // Create a BlobClient representing the source blob to copy.
        BlobClient sourceBlob = container.GetBlobClient(blobName);

        // Ensure that the source blob exists.
        if (await sourceBlob.ExistsAsync())
        {
            // Lease the source blob for the copy operation 
            // to prevent another client from modifying it.
            BlobLeaseClient lease = sourceBlob.GetBlobLeaseClient();

            // Specifying -1 for the lease interval creates an infinite lease.
            await lease.AcquireAsync(TimeSpan.FromSeconds(-1));

            // Get the source blob's properties and display the lease state.
            BlobProperties sourceProperties = await sourceBlob.GetPropertiesAsync();

            // Get a BlobClient representing the destination blob with a unique name.
            BlobClient destBlob = 
                container.GetBlobClient("my-folder/" + sourceBlob.Name);

            // Start the copy operation.
            await destBlob.StartCopyFromUriAsync(sourceBlob.Uri);

            // Get the destination blob's properties and display the copy status.
            BlobProperties destProperties = await destBlob.GetPropertiesAsync();

         
            // Update the source blob's properties.
            sourceProperties = await sourceBlob.GetPropertiesAsync();

            if (sourceProperties.LeaseState == LeaseState.Leased)
            {
                // Break the lease on the source blob.
                await lease.BreakAsync();

                // Update the source blob's properties to check the lease state.
                sourceProperties = await sourceBlob.GetPropertiesAsync();
            }
        }   
}


17 March, 2020

Azure key vault with .net framework 4.8


Azure Key Vault  With .Net Framework 4.8


I was asked to migrate asp.net MVC 5 web application to Azure and I were looking for the key vault integrations and access all the secrete out from there.

Azure Key Vault Config Builder


Configuration builders for ASP.NET are new in .NET Framework >=4.7.1 and .NET Core >=2.0 and allow for pulling settings from one or many sources. Config builders support a number of different sources like user secrets, environment variables and Azure Key Vault and also you can create your own config builder, to pull in configuration from your own configuration management system.

Here I am going to demo Key Vault integrations with Asp.net MVC(download .net framework 4.8). You will find that it's magical, without code, changes how your app can read secretes from the key vault. Just you have to do the few configurations in your web config file.

Prerequisite:
Following resource are required to run/complete this demo
·        Azure subscription
o   Create an Azure web app
o   Create a key vault resource
§  Add a couple of secretes
·        Visual studio 2019 ready to use on your machine
·        .Net Framework 4.8 installed

Configuration Details

I have ready code/running for you that you can download code from Git Hub

The NuGet package  “Microsoft.Configuration.ConfigurationBuilders.Azure” version 2.0.0. It will facilitate to access the give secretes from the azure key vault. when you will install this package it will install all the required other packages.


When you will install it will make the following changes in your web.config file. you need to update your key vault name here.

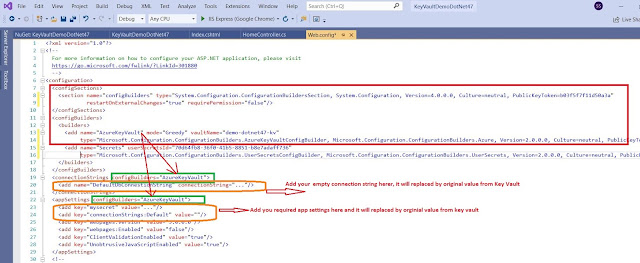
  <add name="AzureKeyVault"  vaultName="demo-dotnet47-kv
  • Above highlighted key vault name you need to replace with yours once.
if you want to render and read connection string to decore with

<connectionStrings configBuilders="AzureKeyVault">

if you want to render your app setting from key vault so decorate with same like connection sting you can see the highlighted in green color

You need to add the empty connection string and add secrete with the same name, see the highlighted items in orange color

web.config


Let's see the Key Vault and Secretes

If you are new to the azure key vault please visit this tutorial so learn around and provision steps

here is the one that we have used in this demo. 
If you are running the app from your local machine so make sure that you logged with the same principle(user Id) that you added under the azure key vault access policy otherwise your app will be unable to access the secretes

if you are running you this demo after publishing the azure web app, make sure that you have added Managed Identity on and you have granted access to it under key vault access policy.

in this demo we are trying access only below highlighted secretes from key vault no all because of the default config builder behavior mode="strict". if you want to read/add all the secrets then set up the mode = "Greedy"  in the above config file 

  <add name="AzureKeyVault" mode="Greedy" vaultName="demo-dotnet47-kv" 


azure key vault


Key Vault Access Policy Settings

key-vault-access-policy

Managed Identity setup for your web app:


web-app-manged-identity


Asp.net MVC 5 Code and Neuget Packages Details


once you will download this code from Git Hub, you will notice the following changes

NuGet Packages:
config-builder-nuget-packages.JPG


Code demo to read secretes:

read-secretes-value


Show these values on view: not best practices its a just for the demo and with demo secretes.


show-secretes-over-view.JPG


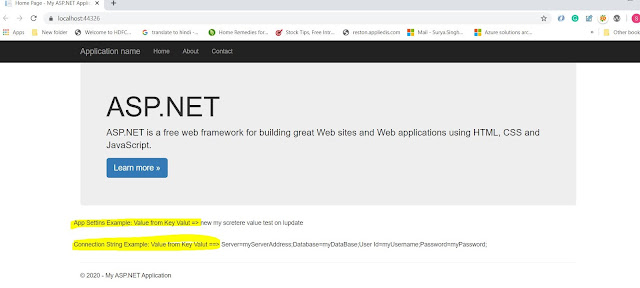
Finally, we have done with all the required changes so let's run the app and see the result.

A result from the local machine 

Before running this app lets do the last thing. Open Azure CLI(CMD) and run the command "az login" because managed Identity use azure CLI to get generate token to connect with Azure resources.


AzureKeyVaultConfigBuilder demo local

Let's have demo app running over the azure

azure-app-demo.JPG

13 March, 2020

Azure Traffic Manager vs Azure Front Door


Azure Front Door

Applications need to improve performance, scale their application, enable instant failover, or enable complex application architectures like IaaS and PaaS, on-prem + cloud, or multi-cloud hybrid experiences.  Adding AFD in front of your application or API  you will fill improvements and optimizations at the edge such as TCP Fast Open, WAN optimizations, and improvements to SSL such as SSL session resumption.

AFD is a scalable and secure entry point for the fast delivery of your global applications. AFD is your one-stop solution for your global website/application and provides the following feature:

  • AFD built on world-class Microsoft Global Network infrastructure. Always keep your traffic on the best path to your app, improve your service scale, reduce latency and increase throughput for your global users with edge load balancing and application acceleration.
  • SSL offload and application acceleration at the edge close to end-users
  • Global HTTP load balancing with instant failover
  • Actionable insights about your users and back ends
  • Web Application Firewall (WAF) and DDoS Protection
  • The central control plane for traffic orchestration

Most Popular AFD Features:

  • Globally distributed microservice applications
  • Dynamic applications with global reach
  • Global, real-time performance and availability for your app or API
  • Scale up your global application
  • Protect your app from attacks
  • Centralized traffic orchestration view
Azure Front Door Example Diagram
Credit: https://azure.microsoft.com/

Azure Traffic Manager 

Domain Name System(DNS)-based traffic load balancer that enables to distribute traffic optimally to services across global Azure regions while providing high availability and responsiveness.
Traffic Manager uses DNS to direct client requests to the most appropriate service endpoint based on a traffic-routing method and the health of the endpoints. Followings are the most popular feature:

  • Increase application availability
  • Improve application performance
  • Perform service maintenance without downtime
  • Combine hybrid applications
  • Distribute traffic for complex deployments 

Traffic-routing method


  • Priority: Best to use when you need to use a primary service endpoint for all traffic, and provide backups in case the primary or the backup endpoints are unavailable.
  • Weighted: Best to use when you need to distribute traffic across a set of endpoints, either evenly or according to weights, which you define.
  • Performance: Best to use when you need to have endpoints in different geographic locations and you want end users to use the "closest" endpoint in terms of the lowest network latency.
  • Geographic:  user's shall be directed to specific endpoints (Azure, External, or Nested) based on which geographic location their DNS query originates from. Examples include complying with data sovereignty mandates, localization of content & user experience and measuring traffic from different regions.
  • Multivalue: Select MultiValue for Traffic Manager profiles that can only have IPv4/IPv6 addresses as endpoints. When a query is received for this profile, all healthy endpoints are returned.
  • Subnet: Select Subnet traffic-routing method to map sets of end-user IP address ranges to a specific endpoint within a Traffic Manager profile. When a request is received, the endpoint returned will be the one mapped for that request’s source IP address.
Azure Traffic Manager
Credit: https://docs.microsoft.com


04 February, 2020

Azure Active Directory- Restrict Application Access To Users or A Group

Azure Active Directory- Restrict Application Access To Users or A Group

This article will show, how you can restrict your app for the give users/group only. Once you are done with app registrations then you can use the Enterprises Application sections to provision access to allowed users only or users existing under the group.

Azure Ad Group

Azure Active Directory offers a mechanism to use groups to manage access to cloud-based web apps, on-premises apps, and other resources. For example Software as a Service (SaaS) apps, Azure services, SharePoint sites, and on-premises resources.

See this Angular 8 App With Azure Active Directory Authentication post for the step by step registrations flow if you are not aware.

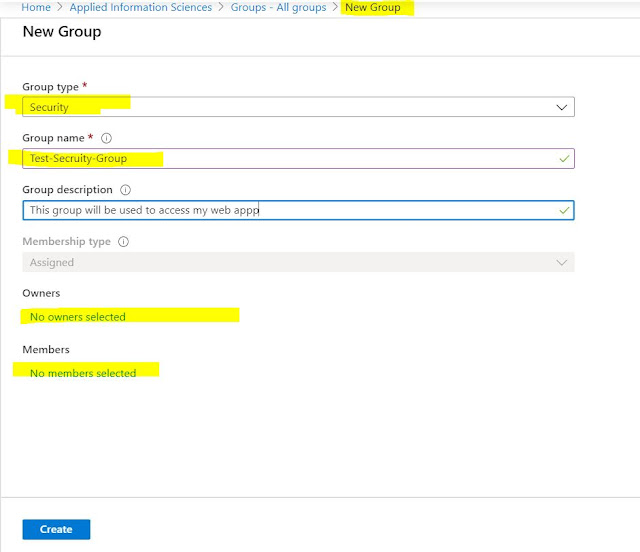
Create an Azure Ad Group (Security):

  1. Log in to the Azure portal with an administrator account if you are not admin then take help from your concern admin team. (mostly normal user can not create the group)
  2. Click on the All services item on the main menu or Find Azure Active Directory in the left panel.
  3. Choose the directory you are using for the application.
  4. Choose Groups >> New Group
  5. Choose the Group Type to Security
  6. Provide a meaning full group name
  7. Add users under the member's sections that you are going to allow to access your application
  8. Click on Create button 
Create Azure Ad Security Group

How to Configure the Application?

Follow the following steps to configure your app:
  1. Log in to the Azure portal with your account(an administrator account will be required but you can take help from your Cloud Admin/DevOps Team) or as an owner of the app under Enterprise apps.
  2. Click on the All services item on the main menu or Find Azure Active Directory in the left panel.
  3. Choose the directory you are using for the application.
  4. Click on the Enterprise applications tab.
  5. Select your application from the list of applications associated with this directory.
  6. Click the Properties tab.
  7. Change the User assignment required? toggle to Yes.
  8. Click the Save button at the top of the screen.
user-assignment-required


Assign Group to App


  1. To assign group(s) to an application directly, follow the steps below:
  2. Open the Azure portal and sign in as a Global Administrator or as a non-admin application owner with an Azure AD Premium license assigned is required
  3. Select  “Azure Active Directory”  in Left Panel to open.
  4. Click Enterprise Applications from the Azure Active Directory left-hand navigation menu.
  5. Click All Applications to view a list of all your applications and filter  with your app name
  6. Select the application you want to assign a user to from the list.
  7. Click Users and Groups from the application’s left-hand navigation menu.
  8. Click the Add button on top of the Users and Groups list to open(filter your group name) the Add Assignment pane.
  9. Click the Users and groups selector from the Add Assignment pane.


Group assignment


Grant tenant-wide admin consent to an application :

Admin consent will be required because the application will be reading the user profile on behalf of the user. Only Global admin can grant the admin consent.
Visit MSDN for more information around the Admin consent.

17 January, 2020

Angular 8 Azure Active Directory Authentication

Angular 8 App With Azure Active Directory Authentication


Today we are going to use the Active Directory Authentication Library (ADAL) for angular 8/JavaScript (ADAL.JS) that offers Azure AD authentication services that can be incorporated in the single-page applications(SPA).

if you are new to Angular 8 so ahead have a look into the first angular 8 projects and then go through the step by steps and instructions to implement authentication.

Step 1: Configuring Azure Active Directory (App Registrations)

  • Login to Azure Portal
  • Click on Azure Active Directory >> App Registrations >> New Registrations
  • Enter the display name
  • Select the supported account type(in my case Single Tenant App)
  • Enter the Redirect URI( default URL for the angular https://localhost:4200/)
  • Click on Register button

AAD-App registrations

  • Find newly created app under app registrations "angular-app-web-dev" and click on Authentication in left panel >> under Implicit grant >>  ID tokens tick the checkbox >> click on the Save Button
AAD App Registration - Authentication Settings


Get the following details from registered App that can be found under Overview sections
  • Client Id - (GUID)
  • Tenant Id - (GUID)
AAD - ClientId and TenantId


Step 2 - Angular Project Updates for ADAL

Open the angular app in vscode and open the terminal  

Install the microsoft-adal-angular6 npm package

Run the following command to install ADAL package and this package will be added to your dependencies section in package.json:

 npm i microsoft-adal-angular6 --save

Update environment.ts file with the following details

Just the end of step -1 we got the tenant id and client Id
    
    tenantId: 'c71b45bc-73d9-4208-95bb-1f5b7dd22cbf',  // replace with yours one here
    clientId: '73d9-4208-95bb-49cd-c71b45bc-73d9-4208', // replace with yours one here
    redirectUri: 'https://localhost:4200', // replace with the yours one here
    postLogoutRedirectUri: 'https://localhost:4200/logout', // replace with yours one here
    extraQueryParameter: 'nux=1' //(optional)
environment.ts

Update app-routing.module.ts  to secure individual route (your route modules)

Import the AuthenticationGuard  into your file

import { AuthenticationGuard } from 'microsoft-adal-angular6';

const routes: Routes = [
  { path: '', component: EmployeeComponent, canActivate: [AuthenticationGuard] } }
];

Update app.module.ts time with followings

Import the MsAdalAngular6Module, AuthenticationGuard into your file

import { MsAdalAngular6Module, AuthenticationGuard } from 'microsoft-adal-angular6';

add imports with the following configuration details

imports: [
    MsAdalAngular6Module.forRoot({
      tenant: environment.tenantId,
      clientId: environment.clientId,
      redirectUri: window.location.origin,
      // endpoints: environment.endpoints,
      navigateToLoginRequestUrl: false,
      extraQueryParameter: environment.extraQueryParameter,
      cacheLocation: 'sessionStorage'
    })
  ],

and also update the providers for the authentication gurad
  providers: [ 
    AuthenticationGuard
  ],

Display the Logged-in User Details

if you want to show the logged-in user details use the these properties


App-component.ts


this.adalSvc.LoggedInUserEmail // Get the Logged In User Email
this.adalSvc.LoggedInUserName // Get the Logged In User Name
this.adalSvc.logout() // Logs out the signed in user

You have done all the possible required steps, You do not have to call the login method it will be called implicitly.

09 January, 2020

Powershell Add Tags To Resources

Powershell Add Tags To Resources

We'll be using  Powershell 7 Preview  that has AZ module to TAG resources
also,  good to read the following article over MSDN Installing PowerShell Core on Windows


 Powershell 7 Preview
 Powershell 7 Preview 
Azure PowerShell Az module
Az offers shorter commands, improved stability, and cross-platform support. Az also has feature equality with AzureRM, which provides a smooth migration path. Windows and PowerShell Core 6.x and later on all supported platforms - including Windows, macOS, and Linux. 

Azure Tag All Resources in a Resource Group

Use the following script to read existing tags for the resource group and apply it to all its resources.

  • It will keep existing tags on resources that aren't duplicates
  • If Resource Tag Key has empty value  then it will replace it with resource group's same Tag key value if exists

# get resource group object
$group = Get-AzResourceGroup -Name TargetedResourceGroupName

#check if group have tags
if ($null -ne $group.Tags) {

    #get all resources from group
    $resources = Get-AzResource -ResourceGroupName $group.ResourceGroupName
  
    foreach ($r in $resources)
    {
       $resourcetags = (Get-AzResource -ResourceId $r.ResourceId).Tags
       # print resource name
        write-host $r.Name
       # print new line
        write-host

        if ($resourcetags)
        {
            foreach ($key in $group.Tags.Keys)
            {
                if (-not($resourcetags.ContainsKey($key)))
                {
                    $resourcetags.Add($key, $group.Tags[$key])
                }
               
                if(!$resourcetags[$key])
                {
                    $resourcetags[$key]=$group.Tags[$key]                   
                }
            }
           # write-host $resourcetags
            Set-AzResource -Tag $resourcetags -ResourceId $r.ResourceId -Force
        }
        else
        {
           Set-AzResource -Tag $group.Tags -ResourceId $r.ResourceId -Force
        }
    }
}