17 January, 2020

Angular 8 Azure Active Directory Authentication

Angular 8 App With Azure Active Directory Authentication


Today we are going to use the Active Directory Authentication Library (ADAL) for angular 8/JavaScript (ADAL.JS) that offers Azure AD authentication services that can be incorporated in the single-page applications(SPA).

if you are new to Angular 8 so ahead have a look into the first angular 8 projects and then go through the step by steps and instructions to implement authentication.

Step 1: Configuring Azure Active Directory (App Registrations)

  • Login to Azure Portal
  • Click on Azure Active Directory >> App Registrations >> New Registrations
  • Enter the display name
  • Select the supported account type(in my case Single Tenant App)
  • Enter the Redirect URI( default URL for the angular https://localhost:4200/)
  • Click on Register button

AAD-App registrations

  • Find newly created app under app registrations "angular-app-web-dev" and click on Authentication in left panel >> under Implicit grant >>  ID tokens tick the checkbox >> click on the Save Button
AAD App Registration - Authentication Settings


Get the following details from registered App that can be found under Overview sections
  • Client Id - (GUID)
  • Tenant Id - (GUID)
AAD - ClientId and TenantId


Step 2 - Angular Project Updates for ADAL

Open the angular app in vscode and open the terminal  

Install the microsoft-adal-angular6 npm package

Run the following command to install ADAL package and this package will be added to your dependencies section in package.json:

 npm i microsoft-adal-angular6 --save

Update environment.ts file with the following details

Just the end of step -1 we got the tenant id and client Id
    
    tenantId: 'c71b45bc-73d9-4208-95bb-1f5b7dd22cbf',  // replace with yours one here
    clientId: '73d9-4208-95bb-49cd-c71b45bc-73d9-4208', // replace with yours one here
    redirectUri: 'https://localhost:4200', // replace with the yours one here
    postLogoutRedirectUri: 'https://localhost:4200/logout', // replace with yours one here
    extraQueryParameter: 'nux=1' //(optional)
environment.ts

Update app-routing.module.ts  to secure individual route (your route modules)

Import the AuthenticationGuard  into your file

import { AuthenticationGuard } from 'microsoft-adal-angular6';

const routes: Routes = [
  { path: '', component: EmployeeComponent, canActivate: [AuthenticationGuard] } }
];

Update app.module.ts time with followings

Import the MsAdalAngular6Module, AuthenticationGuard into your file

import { MsAdalAngular6Module, AuthenticationGuard } from 'microsoft-adal-angular6';

add imports with the following configuration details

imports: [
    MsAdalAngular6Module.forRoot({
      tenant: environment.tenantId,
      clientId: environment.clientId,
      redirectUri: window.location.origin,
      // endpoints: environment.endpoints,
      navigateToLoginRequestUrl: false,
      extraQueryParameter: environment.extraQueryParameter,
      cacheLocation: 'sessionStorage'
    })
  ],

and also update the providers for the authentication gurad
  providers: [ 
    AuthenticationGuard
  ],

Display the Logged-in User Details

if you want to show the logged-in user details use the these properties


App-component.ts


this.adalSvc.LoggedInUserEmail // Get the Logged In User Email
this.adalSvc.LoggedInUserName // Get the Logged In User Name
this.adalSvc.logout() // Logs out the signed in user

You have done all the possible required steps, You do not have to call the login method it will be called implicitly.

09 January, 2020

Powershell Add Tags To Resources

Powershell Add Tags To Resources

We'll be using  Powershell 7 Preview  that has AZ module to TAG resources
also,  good to read the following article over MSDN Installing PowerShell Core on Windows


 Powershell 7 Preview
 Powershell 7 Preview 
Azure PowerShell Az module
Az offers shorter commands, improved stability, and cross-platform support. Az also has feature equality with AzureRM, which provides a smooth migration path. Windows and PowerShell Core 6.x and later on all supported platforms - including Windows, macOS, and Linux. 

Azure Tag All Resources in a Resource Group

Use the following script to read existing tags for the resource group and apply it to all its resources.

  • It will keep existing tags on resources that aren't duplicates
  • If Resource Tag Key has empty value  then it will replace it with resource group's same Tag key value if exists

# get resource group object
$group = Get-AzResourceGroup -Name TargetedResourceGroupName

#check if group have tags
if ($null -ne $group.Tags) {

    #get all resources from group
    $resources = Get-AzResource -ResourceGroupName $group.ResourceGroupName
  
    foreach ($r in $resources)
    {
       $resourcetags = (Get-AzResource -ResourceId $r.ResourceId).Tags
       # print resource name
        write-host $r.Name
       # print new line
        write-host

        if ($resourcetags)
        {
            foreach ($key in $group.Tags.Keys)
            {
                if (-not($resourcetags.ContainsKey($key)))
                {
                    $resourcetags.Add($key, $group.Tags[$key])
                }
               
                if(!$resourcetags[$key])
                {
                    $resourcetags[$key]=$group.Tags[$key]                   
                }
            }
           # write-host $resourcetags
            Set-AzResource -Tag $resourcetags -ResourceId $r.ResourceId -Force
        }
        else
        {
           Set-AzResource -Tag $group.Tags -ResourceId $r.ResourceId -Force
        }
    }
}

06 January, 2020

Web App for Containers Azure Step by Step Example

Deploy and Run a Containerized Web App with Azure App Service

Today we are going to talk about the "how to deploy and run a Containerized Asp.net Core Web App with Azure App Service"? 
It'll be great if you a basic understanding of the followings:
  1. You should have basic knowledge about the Azure App Service
  2. .Net and Visual Studio
  3. Docker and Containerizations

Development Env Setup

  1. You need Azure subscription (if you don thave then get a free one)
  2. You need Visual Studio 2019, click here to download
  3. You need to install docker on your local dev Machine

We shall complete the whole exercise in next 4 steps only

Step 1: Create Azure Container Registry

Go to the Azure portal and click on Create New Resource>>Containers and Click on the Container Registry
Fill up the Create Container Registry Form, and also Enable Admin User and click on Create Button. see below for your reference

finally, your registry container will be created with the given name.

Step 2: Visual Studio 2019 -Create a Web App

Open Visual Studio 2019 and  Click on "Create a new project"


Select "ASP.NET Core Web Application"

Provide the project name 

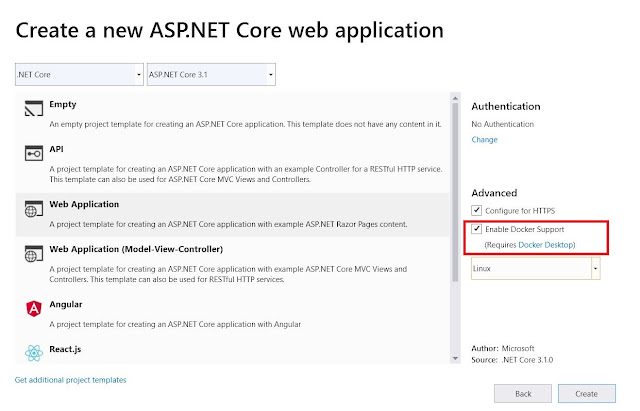
Tick the "Enable Docker Support" checkbox and click on Create Button


Here you must have the running Docker on your machine same you can see just below the "Enable Docker Support" checkbox 

Setup 3: Publish Web Application

Complete the following steps to send your web application contents to Azure Container Registry, which uses the instructions in the Docker file to build the image and store it.

Right Click on Solution and Click on Publish >> Start >> Container Registry >> Select Existing Azure Container Registry and then click on Create Profile button, Here is a screenshot for the reference


May it ask to login, so use your azure portal credentials to login purpose here.

Now Select the recently(in step 1) created Azure container registry.

Click on the OK button and wait for the few minutes it will publish apps images/binary to Azure Container Register and you can validate with the same like the following screenshot:


Step 4: Create a Web App for Containers

Click in Create New Resources and sear for the "Web App for Containers"

Fill up the form with all the required field Here is a screenshot for your reference

Click on "Next: Docker >" button and fill Azure container registry options details according to above created in step 1

Click on "Review + Create" button and finally you will the below screen, review the provided data and click on Create button

Wait for the few minutes and your app will be provisioned  and ready to use
finally, visit your web app URL to see your first running web in the container.
Once the deployment is completed visit your web app explores the URL to see the running application

Congratulation you have done with the hello world docker host and web app!!

05 January, 2020

Azure SQL vs Cosmos db

Global Databases: Azure SQL vs Cosmos db


Cosmos DB is a fully managed, multi-model and globally distributed database  that offers the following capabilities:
  • Capable to store relational data, semi-structured data(supports document, key-value, graph, and columnar data models)
  • Fast, single-digit-millisecond data access using popular API including SQL, MongoDB, Cassandra, Tables, or Gremlin(graph).
  • Data is completely transparently encrypted and secure by default
  • Azure Cosmos DB natively partitions your data for high availability and scalability. Azure Cosmos DB offers 99.99% guarantees for availability, throughput, low latency, and consistency on all single-region accounts and all multi-region accounts with relaxed consistency, and 99.999% read availability on all multi-region database accounts for both reads and writes.
  • Azure Cosmos DB is ISO, FedRAMP, EU, HIPAA, and PCI compliant

Geo-replication

While creating Cosmos DB account multi-region, we can choose from the following modes:

Multi-region accounts with multiple write regions.

In this mode, all copies of the database are writable at all times. If a region fails, no failover is necessary.

Multi-region accounts with a single write region.

In this mode, only the primary region contains writable databases. The data replicated to the secondary regions are read-only. You can select enable automatic failover (by default disabled) so that Cosmos DB automatically fails over the primary, writable copy of the database to another region.


In Cosmos DB, data replication is synchronous. When a change is applied, the transaction is not considered complete until replicated across the replicas. Then an acknowledgment is sent to the client. When a failure occurs, no recent changes are lost because replication has already occurred.

Common Azure Cosmos DB Use Cases

  • IoT and telematics
  • Retail and marketing
  • Gaming
  • Social Applications
  • Personalization

Cosmos Db Pricing

Azure Cosmos DB bills for provisioned throughput and consumed storage by the hour. Visit here for the latest pricing here

Azure SQL Database

Azure SQL Database is a relational database-as-a-service (DBaaS)  and PaaS based on the latest stable version of Microsoft SQL Server with following deployment models like Single database, Elastic pools, Managed instance, Instance pools. We can use either:
  • Active geo-replication
  • Auto failover groups

Active Geo-replication

  • Azure SQL Database can automatically replicate a database and all its changes from one database to replicas with the active geo-replication feature. 
  • Only the primary server hosts a writable copy of the database, up to four other logical servers can be created that host read-only copies of the database.
  • Managed instances of Azure SQL Database do not support Active geo-replication.
  • Developers can write code that calls the failover method in the Azure SQL Database REST API.

Auto Failover Groups

An auto-failover group is a group of databases where data replicates automatically from a primary to underlying secondary servers. The data replication method is the same as active geo-replication. However, You can automate the response to a failure by defining a policy.
The replication uses the asynchronous method for the data replication for both active geo-replication and auto-failover groups. An acknowledgment is sent to the client when a change is applied to the primary replica. At this point, the transaction is considered complete, and replication occurs. If a failure occurs, the latest changes made in the primary database may not have replicated to the secondary. Keep in mind that, after a disaster, the most recent database changes may have been lost.

SQL Service Tier and SLA

Please visit MSDN for the latest SLA and pricing data

Bonus Tips:

If a failure occurs,
  • Azure Cosmos Db: No recent changes/data are lost because replication has already occurred
  • Azure SQL database: keep in mind that, after a disaster, the most recent database changes may have been lost


02 January, 2020

What is Business Continuity and Disaster Recovery (BCDR)

Importance of Business Continuity and Disaster Recovery Planning

BCDR planning is to achieve High Availability for your business application, services, data. For example, your application is hosted in a data center that resides in a natural disaster zone like an Earthquake, Flood, Tsunami, etc. When these such a bad event will occur there quite a high chance to lose data/application forever even the whole data center that can not be recovered at all if the organization does not have the right BCDR planning.

To support business continuity your company must have disaster recovery plans and there's a mixture of virtualized and physical systems at the data center.

Business Continuity and Disaster Recovery(BCDR)

Whenever systems are unavailable can cause your company to lost revenue. Generally, every application and services come with SLA(Service Level Agreement) so the company also might face financial penalties for breaking agreements written for the availability of the services you provide.

BCDR plans are documented steps that the company prepares up that cover the scope and actions to be taken when a disaster or outage happens. Each outage is assessed on its own merit. For example, a disaster recovery plan comes into action when a whole datacenter having a power outage, internet outage, etc.


For the example scenario, a natural disaster occurred like an earthquake, Tsunami, etc. and damaged communications lines made the datacenter or region where your application is hosted and running so your application is useless until that region is up. 

A disaster of this size might bring services down for days, or more than 24 hours, so a full BCDR plan must be invoked to get the service back online.


As part of your BCDR plan for your applications

  • Identify the recovery time objectives (RTOs) 
  • Identify the recovery point objectives (RPOs) 

Both objectives help to realize the maximum tolerable hours that your business can be without specified services, and what the data recovery process should be


Recovery Time Objective(RTO)

An RTO is a measure of the maximum amount of time your business can survive after a disaster before normal service is restored. 
For Example,
  • Your RTO is 12 hours, which means that operations can continue for 12 hours without the business's core services functioning. 
  • If the downtime is 24 hours, your business would be seriously harmed.

Recovery Point Objective(RPO)

An RPO is a measure of the maximum amount of data loss that's acceptable during a disaster. A business can typically decide to do a backup every 24 hours, 12 hours, or even in real-time. incase of disaster, always some data loss.

For example, 

  • Let's say your backup occurred every 24 hours, at midnight 
  • A disaster happened at 9:00 AM the following day, 
  • So 9 hours of data would be lost. 
  • If your application RPO was 12 hours, It would be fine because only 9 hours passed(still 3 hours remaining)
  • If the RPO was 4 hours, for sure there would be a problem and damage would occur to the business(5 hours over in this given scenario).

Bonus Tips:

Whenever you planning to host your application/services (including all the services like the frontend, web API, database, etc).
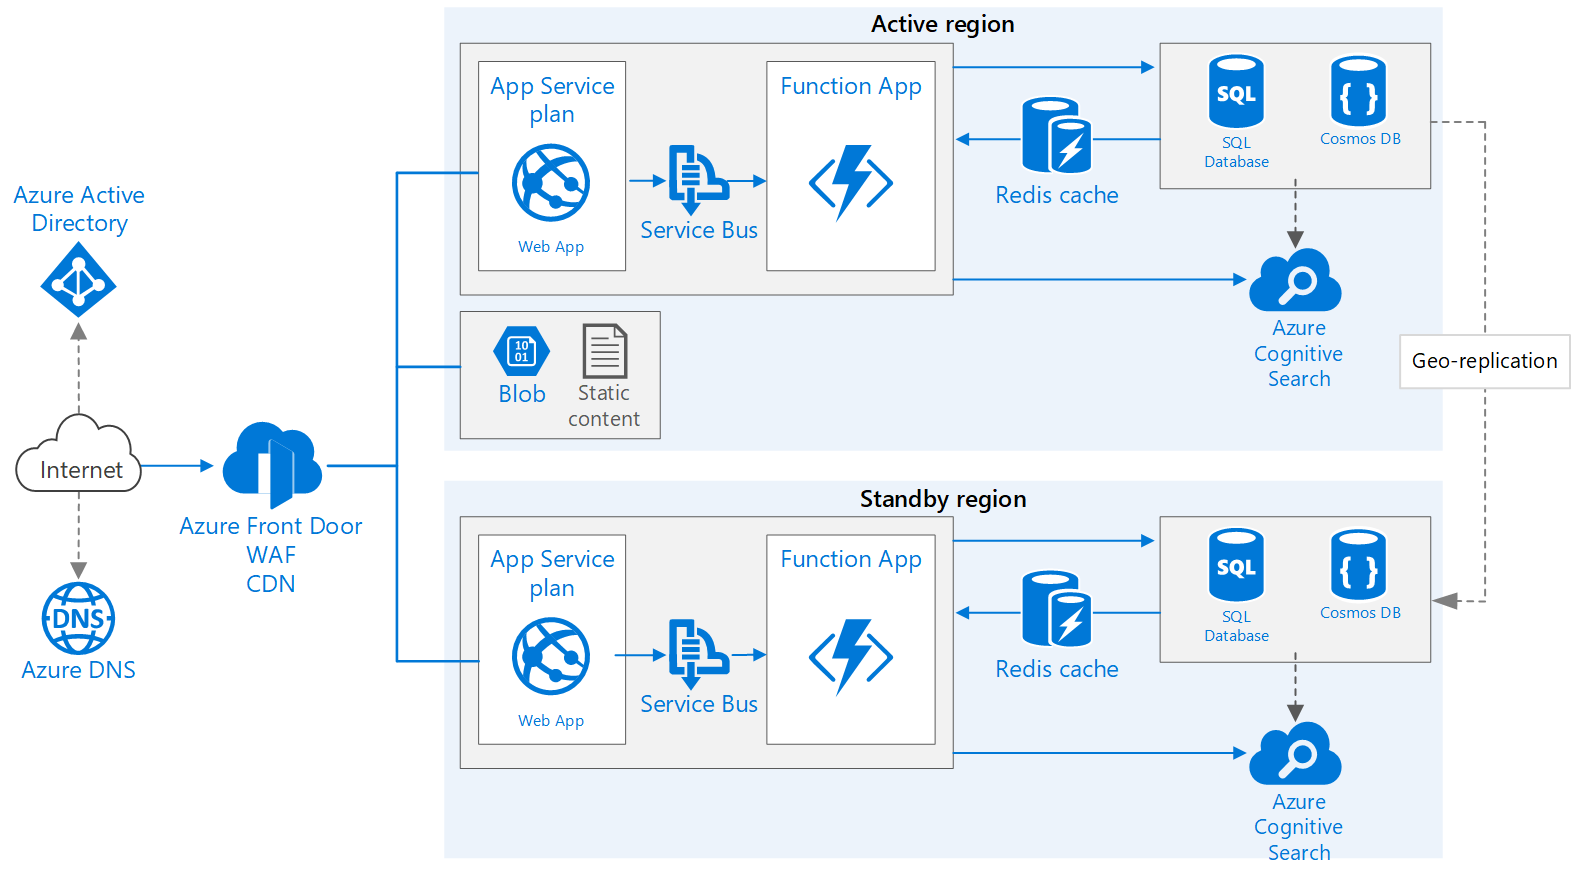
  • You should host in two different physical regions (like east US and west US)
  • That way you will be having the secondary and primary region
  • So at least your services can be available up and running if a disaster occurred in one region 
  • See the below diagram for the example of a Web Application and related services (BCDR) 
Credit to Microsoft Docs(MSND)- Fig from MSND


Microservices vs Monolithic Architecture

 Microservices vs Monolithic Architecture Here’s a clear side-by-side comparison between Microservices and Monolithic architectures — fro...