React Native Expo Save File to Device in Given Folder

React Native Expo: Save File to Device in Given Folder

Currently, there is no easy solution and feature or trick or tutorial how to write files on internal storage and that is very tedious work to save find on the given provided folder and  app directory with expo without detaching

I want to save files on internal storage like Downloads, WhatsApp, DCIM, Pictures

This feature useful for the app with download files/picture/music feature. 

In this working tutorial, we are going to download video files from the server and the same file will be moved to the desire device folder.

Here are steps that you need to do,  This is working code in ANDROID and that should work on iOs as well.

You need to install following expo packages expo-media-library, expo-permissions and expo-file-system

  • Permissions.CAMERA_ROLL Permission is required, that should be fine.
  • Using FileSystem to download video, it will provide local URI from device
  • After call saveFile method to move the file to the desired folder.


import * as MediaLibrary from 'expo-media-library';

import * as Permissions from 'expo-permissions';

 import * as FileSystem from 'expo-file-system';

const saveFile = async (fileUri=> {

  const { status } = await Permissions.askAsync(Permissions.CAMERA_ROLL);

  if (status === 'granted') {

    const asset = await MediaLibrary.createAssetAsync(fileUri);

    await MediaLibrary.createAlbumAsync('<FOLDER NAME>'assetfalse);

  }

};

 const fileDownLoad = async () => {

    let lastIndex = media?.uri.lastIndexOf('/');

    let fileName = media?.uri.substring(lastIndex);


    let downloadResumable = FileSystem.createDownloadResumable(

      "http://d23dyxeqlo5psv.cloudfront.net/big_buck_bunny.mp4",

      FileSystem.documentDirectory + fileName,

      {},

      () => {

        // down progress monitor here

      }

    );

    try {

      const { uri } = await downloadResumable.downloadAsync().then((item=> {

        return item;

      });


      await saveFile(uri)

        .then((rs=> {

          alert('Video saved to download folder);

        });

    } catch (e) {

      console.error(e);

    }

  };


Node.js is Dead – Long live Deno- deno vs node

Node.js is Dead – Long live Deno

Deno is a new runtime for JavaScript and TypeScript, invented by Ryan Dahl - the original author/creator of Node.js. The persistence of this project to fix design problems in Node.js described in Dahl's famous talk "10 Things I Regret About Node.js".  Here I am providing depth differences between Node.js and Deno. 

Differences between Node.js and Deno

Deno Node.Js
Deno does not use npm
It uses modules referenced as URLs or file paths
Use npm
Deno does not use package.json Node use package.json for dependency and module management
All async actions in Deno return a promise  The async_hooks module provides an API to track asynchronous resources.
Deno requires explicit permissions for the file, network, and environment access Node.js does not required any explicit permissions to access network files. It has all default permissions.
Deno always dies on uncaught errors  Node.js follows a callback pattern where an error object is the first argument and data is the second argument.
Uses "ES Modules" and does not support require()Uses "ES Modules" and does not support require()
import * as the log from "https://deno.land/std/log/mod.ts"
Node.js use required() method to import libraries 
Modules/files loaded from remote URLs are intended to be immutable and cacheable  All the module(npm-modules) reside under your work repository
Visit 4cb.online and for hands-on with Hello-world Deno App

Angular 9 with Docker Step by Step example

Angular 9 with Docker Step by Step example


I had the plan to learn docker and use an angular app running under the docker environment. I was struggling to get the right and simple steps to start with. So I invested almost 2 days to learn basic docker and working with angular 9 and finally I was able to make it. Congrats to me!! 😊

Setting up the local environment and workspace

Prerequisites:

Angular Project Setup :

After installing the above tools open you CMD/Angular CLI 

installed Angular: If you are new to an angular good visit here learn and step  https://angular.io/guide/setup-local

Step 1: Install the Angular CLI

               npm install -g @angular/cli

Step 2: Create Hello World application

ng new hello-world

Step 3: Run the application

cd my-app

ng serve --open

 or Open your working folder(hello-world) in vs code and run ng serve --open

Great you are down with your angular project and your application is running now you can verify visiting over http://localhost:4200/ 

Docker Setup for your Hello-World Applications

 What is Docker?

·        Docker is a set of platforms as a service products,

·        Uses OS-level virtualization to deliver software in packages called containers.

·        Developed by: Docker, Inc.

·        and Written in: Go,

·        Initial release date: 20 March 2013

What can I use Docker for?

·        Fast, consistent delivery of your applications

·        Responsive deployment and scaling

·        Running more workloads on the same hardware

 you are new to Docker, then visiting the following docker official website https://www.docker.com/ to learn

Visuals Studio Code Setup:

Got VS Code >> Extensions >> Search “Docker” >> install one from Microsoft only

visual-studio-code-docker-extension

Step 4: under your project root directory create a file named DockerFile (Without any Extensions), you can also create docker file with help VS CODE Command Palette...

Step 5: paste the following code to your DockerFile:

        Get a docker file code and details from here: http://4cb.online/blogs/Angular-app-with-Docker-Step-by-Step-exampleile data from here:  

Note*: If you are facing any issue related to Nginx Just install with the following command

Npm install nginx

What is nginx?

NGINX is open-source software and provides a mechanism for web serving, reverse proxying, caching, load balancing, media streaming, etc. It started out as a web server designed for maximum performance and stability. In addition to its HTTP server capabilities, and load balancer for HTTP, TCP, and UDP servers.

Step 6: Build Image with VS Code

               Open your docker file created in Step 5

               Right Click(mouse) >> Build Image...

               Select your latest project:   "hellodocker:latest"

Step 7: RUN your image with the following command in terminal

               docker run --rm -it  -p 80:80/tcp hellodocker:latest

               or

               got to your image >> right click>> RUN


docker-run-vscode


You have done with your first docker app, by default it is running on port:80, http://localhost/

Finally, here we go with the angular running app

Push to Docker Hub 

As you know docker runs on images(can be called out stopped Containers), you push your hello-world image to docker hub for your future use or next-level learning.

·        Go to https://hub.docker.com/

·        Create your account

·        Note down your docker ID that will be used to push your images

·        To push your hello-world image

·        Open vs code >> right click on image>>push

·        It will ask for docker ID and password first provide it 

And all done 😊


docker hub


.Net Framework 4.8: Azure SQL Database connection from App Service using a managed identity


Azure SQL Database connection from App Service using a managed identity


Azure App Service(Web App) provides a highly scalable, self-patching web hosting accommodation in azure.  It offers a managed identity for your app, which is a turn-key solution for securing access to the Azure SQL database and other azure services.  Managed identities in-app provides a mechanism to your app more secure by eliminating secrets from your app, such as credentials in the connection strings.  

Here we'll integrate managed identity to the sample web app and also with zero lines of code. we'll utilize full configuration capability to make a connection to the Azure SQL database.

Prerequisites:

Following resource are required to run/complete this demo

  • Azure subscription
    • Create an Azure web app
    • Create a key vault resource
  • Visual studio 2019 ready to use on your machine
  • .Net Framework 4.8 installed

You will learn followings:

  • Enable managed identities
  • Grant SQL Database access to the managed identity
  • Connect to SQL Database from Visual Studio using Azure AD authentication

Azure Database Setup

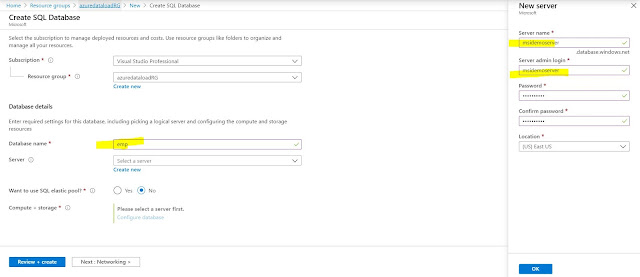
Let's create a database for you according to give screenshot

azure-sql-database-create

Setup Azure Active Directory

Open you newly create azure SQL server and add your email id(that you have used to login to azure portal)

aad-admin-setup

Open Azure Database(for example: emp) and click on Query Editor(Preview) on and log-in with the option “Active Directory authentication” and run following command

login-as-aad


Grant Access to your Web App to Azure SQL Database

This step is not required for the local running the app in visual studio

CREATE USER [<identity-name>] FROM EXTERNAL PROVIDER;
ALTER ROLE db_datareader ADD MEMBER [<identity-name>];
ALTER ROLE db_datawriter ADD MEMBER [<identity-name>];
ALTER ROLE db_ddladmin ADD MEMBER [<identity-name>];
GO

[<identity-name>] : Your web app Identity that will be required only when your code hosted over underlying web app to make the connection between an azure web app and your emp database.

execute-query


Set up Local Develop Environment(Visual Studio)

You must be login into the visual studio with same principle/user name that you have used to access https://portal.azure.com/

  • To enable development and debugging in Visual Studio, add your Azure AD user in Visual Studio by selecting File > Account Settings from the menu, and click Add an account.
  • Add  latest Nuget Package “Microsoft.Azure.Services.AppAuthentication” to your underlying project
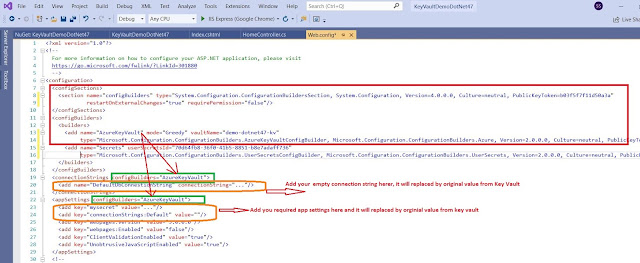
  • Open your Web.config,  file and the following configurations

  <configSections>
    <section name="SqlAuthenticationProviders" type="System.Data.SqlClient.SqlAuthenticationProviderConfigurationSection, System.Data, Version=4.0.0.0, Culture=neutral, PublicKeyToken=b77a5c561934e089" />
  </configSections>
  <SqlAuthenticationProviders>
    <providers>
      <add name="Active Directory Interactive" type="Microsoft.Azure.Services.AppAuthentication.SqlAppAuthenticationProvider, Microsoft.Azure.Services.AppAuthentication" />
    </providers>
  </SqlAuthenticationProviders>
  <connectionStrings>
    <add name="BasicDatabaseConnectionString" connectionString="server=msidemoserver.database.windows.net;database=emp;UID=ManagedIdentity;Authentication=Active Directory Interactive" />
  </connectionStrings>

Note: update the connection string  with your Azure SQL server name and database

Sample web.config file: 
web-config-file-changes

You're now ready to develop and debug your app with the SQL Database as the back end, using Azure AD authentication.


Let's run from your local machine and if your running given sample code(Download Sample Code from Git Hub) so you will see the following screen:

successfull-db-connection-running app.JPG


Please provide your comment and feedback, that'll be highly appreciated.

Azure key vault with .net framework 4.8


Azure Key Vault  With .Net Framework 4.8


I was asked to migrate asp.net MVC 5 web application to Azure and I were looking for the key vault integrations and access all the secrete out from there.

Azure Key Vault Config Builder


Configuration builders for ASP.NET are new in .NET Framework >=4.7.1 and .NET Core >=2.0 and allow for pulling settings from one or many sources. Config builders support a number of different sources like user secrets, environment variables and Azure Key Vault and also you can create your own config builder, to pull in configuration from your own configuration management system.

Here I am going to demo Key Vault integrations with Asp.net MVC(download .net framework 4.8). You will find that it's magical, without code, changes how your app can read secretes from the key vault. Just you have to do the few configurations in your web config file.

Prerequisite:
Following resource are required to run/complete this demo
·        Azure subscription
o   Create an Azure web app
o   Create a key vault resource
§  Add a couple of secretes
·        Visual studio 2019 ready to use on your machine
·        .Net Framework 4.8 installed

Configuration Details

I have ready code/running for you that you can download code from Git Hub

The NuGet package  “Microsoft.Configuration.ConfigurationBuilders.Azure” version 2.0.0. It will facilitate to access the give secretes from the azure key vault. when you will install this package it will install all the required other packages.


When you will install it will make the following changes in your web.config file. you need to update your key vault name here.

  <add name="AzureKeyVault"  vaultName="demo-dotnet47-kv
  • Above highlighted key vault name you need to replace with yours once.
if you want to render and read connection string to decore with

<connectionStrings configBuilders="AzureKeyVault">

if you want to render your app setting from key vault so decorate with same like connection sting you can see the highlighted in green color

You need to add the empty connection string and add secrete with the same name, see the highlighted items in orange color

web.config


Let's see the Key Vault and Secretes

If you are new to the azure key vault please visit this tutorial so learn around and provision steps

here is the one that we have used in this demo. 
If you are running the app from your local machine so make sure that you logged with the same principle(user Id) that you added under the azure key vault access policy otherwise your app will be unable to access the secretes

if you are running you this demo after publishing the azure web app, make sure that you have added Managed Identity on and you have granted access to it under key vault access policy.

in this demo we are trying access only below highlighted secretes from key vault no all because of the default config builder behavior mode="strict". if you want to read/add all the secrets then set up the mode = "Greedy"  in the above config file 

  <add name="AzureKeyVault" mode="Greedy" vaultName="demo-dotnet47-kv" 


azure key vault


Key Vault Access Policy Settings

key-vault-access-policy

Managed Identity setup for your web app:


web-app-manged-identity


Asp.net MVC 5 Code and Neuget Packages Details


once you will download this code from Git Hub, you will notice the following changes

NuGet Packages:
config-builder-nuget-packages.JPG


Code demo to read secretes:

read-secretes-value


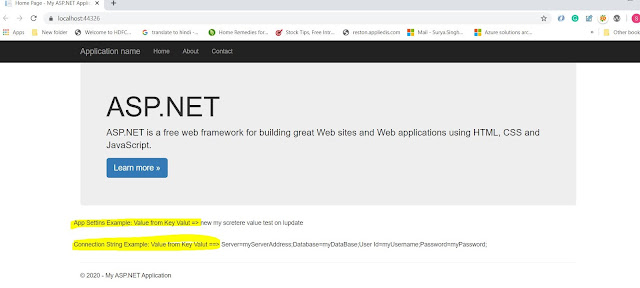
Show these values on view: not best practices its a just for the demo and with demo secretes.


show-secretes-over-view.JPG


Finally, we have done with all the required changes so let's run the app and see the result.

A result from the local machine 

Before running this app lets do the last thing. Open Azure CLI(CMD) and run the command "az login" because managed Identity use azure CLI to get generate token to connect with Azure resources.


AzureKeyVaultConfigBuilder demo local

Let's have demo app running over the azure

azure-app-demo.JPG

Azure Traffic Manager vs Azure Front Door


Azure Front Door

Applications need to improve performance, scale their application, enable instant failover, or enable complex application architectures like IaaS and PaaS, on-prem + cloud, or multi-cloud hybrid experiences.  Adding AFD in front of your application or API  you will fill improvements and optimizations at the edge such as TCP Fast Open, WAN optimizations, and improvements to SSL such as SSL session resumption.

AFD is a scalable and secure entry point for the fast delivery of your global applications. AFD is your one-stop solution for your global website/application and provides the following feature:

  • AFD built on world-class Microsoft Global Network infrastructure. Always keep your traffic on the best path to your app, improve your service scale, reduce latency and increase throughput for your global users with edge load balancing and application acceleration.
  • SSL offload and application acceleration at the edge close to end-users
  • Global HTTP load balancing with instant failover
  • Actionable insights about your users and back ends
  • Web Application Firewall (WAF) and DDoS Protection
  • The central control plane for traffic orchestration

Most Popular AFD Features:

  • Globally distributed microservice applications
  • Dynamic applications with global reach
  • Global, real-time performance and availability for your app or API
  • Scale up your global application
  • Protect your app from attacks
  • Centralized traffic orchestration view
Azure Front Door Example Diagram
Credit: https://azure.microsoft.com/

Azure Traffic Manager 

Domain Name System(DNS)-based traffic load balancer that enables to distribute traffic optimally to services across global Azure regions while providing high availability and responsiveness.
Traffic Manager uses DNS to direct client requests to the most appropriate service endpoint based on a traffic-routing method and the health of the endpoints. Followings are the most popular feature:

  • Increase application availability
  • Improve application performance
  • Perform service maintenance without downtime
  • Combine hybrid applications
  • Distribute traffic for complex deployments 

Traffic-routing method


  • Priority: Best to use when you need to use a primary service endpoint for all traffic, and provide backups in case the primary or the backup endpoints are unavailable.
  • Weighted: Best to use when you need to distribute traffic across a set of endpoints, either evenly or according to weights, which you define.
  • Performance: Best to use when you need to have endpoints in different geographic locations and you want end users to use the "closest" endpoint in terms of the lowest network latency.
  • Geographic:  user's shall be directed to specific endpoints (Azure, External, or Nested) based on which geographic location their DNS query originates from. Examples include complying with data sovereignty mandates, localization of content & user experience and measuring traffic from different regions.
  • Multivalue: Select MultiValue for Traffic Manager profiles that can only have IPv4/IPv6 addresses as endpoints. When a query is received for this profile, all healthy endpoints are returned.
  • Subnet: Select Subnet traffic-routing method to map sets of end-user IP address ranges to a specific endpoint within a Traffic Manager profile. When a request is received, the endpoint returned will be the one mapped for that request’s source IP address.
Azure Traffic Manager
Credit: https://docs.microsoft.com


Azure Active Directory- Restrict Application Access To Users or A Group

Azure Active Directory- Restrict Application Access To Users or A Group

This article will show, how you can restrict your app for the give users/group only. Once you are done with app registrations then you can use the Enterprises Application sections to provision access to allowed users only or users existing under the group.

Azure Ad Group

Azure Active Directory offers a mechanism to use groups to manage access to cloud-based web apps, on-premises apps, and other resources. For example Software as a Service (SaaS) apps, Azure services, SharePoint sites, and on-premises resources.

See this Angular 8 App With Azure Active Directory Authentication post for the step by step registrations flow if you are not aware.

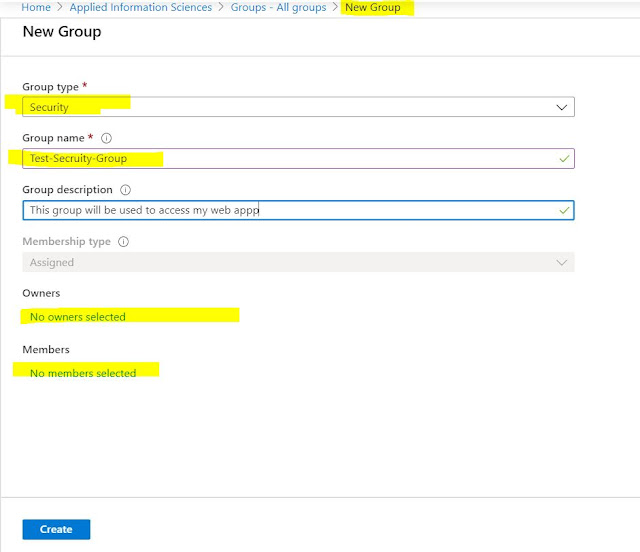
Create an Azure Ad Group (Security):

  1. Log in to the Azure portal with an administrator account if you are not admin then take help from your concern admin team. (mostly normal user can not create the group)
  2. Click on the All services item on the main menu or Find Azure Active Directory in the left panel.
  3. Choose the directory you are using for the application.
  4. Choose Groups >> New Group
  5. Choose the Group Type to Security
  6. Provide a meaning full group name
  7. Add users under the member's sections that you are going to allow to access your application
  8. Click on Create button 
Create Azure Ad Security Group

How to Configure the Application?

Follow the following steps to configure your app:
  1. Log in to the Azure portal with your account(an administrator account will be required but you can take help from your Cloud Admin/DevOps Team) or as an owner of the app under Enterprise apps.
  2. Click on the All services item on the main menu or Find Azure Active Directory in the left panel.
  3. Choose the directory you are using for the application.
  4. Click on the Enterprise applications tab.
  5. Select your application from the list of applications associated with this directory.
  6. Click the Properties tab.
  7. Change the User assignment required? toggle to Yes.
  8. Click the Save button at the top of the screen.
user-assignment-required


Assign Group to App


  1. To assign group(s) to an application directly, follow the steps below:
  2. Open the Azure portal and sign in as a Global Administrator or as a non-admin application owner with an Azure AD Premium license assigned is required
  3. Select  “Azure Active Directory”  in Left Panel to open.
  4. Click Enterprise Applications from the Azure Active Directory left-hand navigation menu.
  5. Click All Applications to view a list of all your applications and filter  with your app name
  6. Select the application you want to assign a user to from the list.
  7. Click Users and Groups from the application’s left-hand navigation menu.
  8. Click the Add button on top of the Users and Groups list to open(filter your group name) the Add Assignment pane.
  9. Click the Users and groups selector from the Add Assignment pane.


Group assignment


Grant tenant-wide admin consent to an application :

Admin consent will be required because the application will be reading the user profile on behalf of the user. Only Global admin can grant the admin consent.
Visit MSDN for more information around the Admin consent.