17 March, 2020

Azure key vault with .net framework 4.8


Azure Key Vault  With .Net Framework 4.8


I was asked to migrate asp.net MVC 5 web application to Azure and I were looking for the key vault integrations and access all the secrete out from there.

Azure Key Vault Config Builder


Configuration builders for ASP.NET are new in .NET Framework >=4.7.1 and .NET Core >=2.0 and allow for pulling settings from one or many sources. Config builders support a number of different sources like user secrets, environment variables and Azure Key Vault and also you can create your own config builder, to pull in configuration from your own configuration management system.

Here I am going to demo Key Vault integrations with Asp.net MVC(download .net framework 4.8). You will find that it's magical, without code, changes how your app can read secretes from the key vault. Just you have to do the few configurations in your web config file.

Prerequisite:
Following resource are required to run/complete this demo
·        Azure subscription
o   Create an Azure web app
o   Create a key vault resource
§  Add a couple of secretes
·        Visual studio 2019 ready to use on your machine
·        .Net Framework 4.8 installed

Configuration Details

I have ready code/running for you that you can download code from Git Hub

The NuGet package  “Microsoft.Configuration.ConfigurationBuilders.Azure” version 2.0.0. It will facilitate to access the give secretes from the azure key vault. when you will install this package it will install all the required other packages.


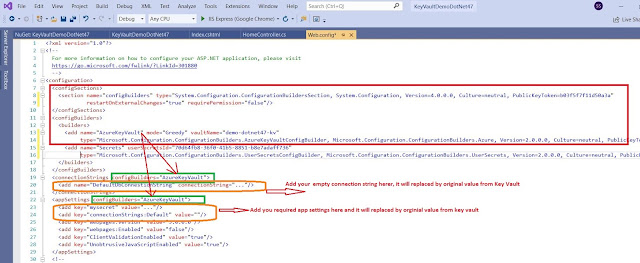
When you will install it will make the following changes in your web.config file. you need to update your key vault name here.

  <add name="AzureKeyVault"  vaultName="demo-dotnet47-kv
  • Above highlighted key vault name you need to replace with yours once.
if you want to render and read connection string to decore with

<connectionStrings configBuilders="AzureKeyVault">

if you want to render your app setting from key vault so decorate with same like connection sting you can see the highlighted in green color

You need to add the empty connection string and add secrete with the same name, see the highlighted items in orange color

web.config


Let's see the Key Vault and Secretes

If you are new to the azure key vault please visit this tutorial so learn around and provision steps

here is the one that we have used in this demo. 
If you are running the app from your local machine so make sure that you logged with the same principle(user Id) that you added under the azure key vault access policy otherwise your app will be unable to access the secretes

if you are running you this demo after publishing the azure web app, make sure that you have added Managed Identity on and you have granted access to it under key vault access policy.

in this demo we are trying access only below highlighted secretes from key vault no all because of the default config builder behavior mode="strict". if you want to read/add all the secrets then set up the mode = "Greedy"  in the above config file 

  <add name="AzureKeyVault" mode="Greedy" vaultName="demo-dotnet47-kv" 


azure key vault


Key Vault Access Policy Settings

key-vault-access-policy

Managed Identity setup for your web app:


web-app-manged-identity


Asp.net MVC 5 Code and Neuget Packages Details


once you will download this code from Git Hub, you will notice the following changes

NuGet Packages:
config-builder-nuget-packages.JPG


Code demo to read secretes:

read-secretes-value


Show these values on view: not best practices its a just for the demo and with demo secretes.


show-secretes-over-view.JPG


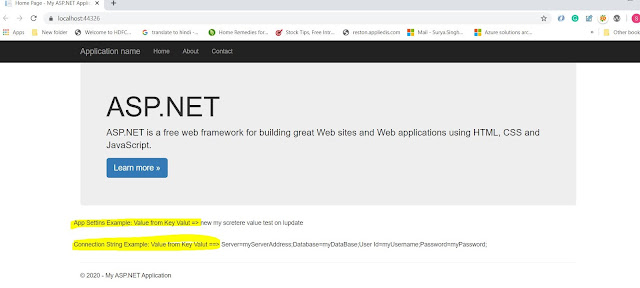
Finally, we have done with all the required changes so let's run the app and see the result.
A result from the local machine 

Before running this app lets do the last thing. Open Azure CLI(CMD) and run the command "az login" because managed Identity use azure CLI to get generate token to connect with Azure resources.


AzureKeyVaultConfigBuilder demo local

Let's have demo app running over the azure

azure-app-demo.JPG

13 March, 2020

Azure Traffic Manager vs Azure Front Door


Azure Front Door

Applications need to improve performance, scale their application, enable instant failover, or enable complex application architectures like IaaS and PaaS, on-prem + cloud, or multi-cloud hybrid experiences.  Adding AFD in front of your application or API  you will fill improvements and optimizations at the edge such as TCP Fast Open, WAN optimizations, and improvements to SSL such as SSL session resumption.

AFD is a scalable and secure entry point for the fast delivery of your global applications. AFD is your one-stop solution for your global website/application and provides the following feature:

  • AFD built on world-class Microsoft Global Network infrastructure. Always keep your traffic on the best path to your app, improve your service scale, reduce latency and increase throughput for your global users with edge load balancing and application acceleration.
  • SSL offload and application acceleration at the edge close to end-users
  • Global HTTP load balancing with instant failover
  • Actionable insights about your users and back ends
  • Web Application Firewall (WAF) and DDoS Protection
  • The central control plane for traffic orchestration

Most Popular AFD Features:

  • Globally distributed microservice applications
  • Dynamic applications with global reach
  • Global, real-time performance and availability for your app or API
  • Scale up your global application
  • Protect your app from attacks
  • Centralized traffic orchestration view
Azure Front Door Example Diagram
Credit: https://azure.microsoft.com/

Azure Traffic Manager 

Domain Name System(DNS)-based traffic load balancer that enables to distribute traffic optimally to services across global Azure regions while providing high availability and responsiveness.
Traffic Manager uses DNS to direct client requests to the most appropriate service endpoint based on a traffic-routing method and the health of the endpoints. Followings are the most popular feature:

  • Increase application availability
  • Improve application performance
  • Perform service maintenance without downtime
  • Combine hybrid applications
  • Distribute traffic for complex deployments 

Traffic-routing method


  • Priority: Best to use when you need to use a primary service endpoint for all traffic, and provide backups in case the primary or the backup endpoints are unavailable.
  • Weighted: Best to use when you need to distribute traffic across a set of endpoints, either evenly or according to weights, which you define.
  • Performance: Best to use when you need to have endpoints in different geographic locations and you want end users to use the "closest" endpoint in terms of the lowest network latency.
  • Geographic:  user's shall be directed to specific endpoints (Azure, External, or Nested) based on which geographic location their DNS query originates from. Examples include complying with data sovereignty mandates, localization of content & user experience and measuring traffic from different regions.
  • Multivalue: Select MultiValue for Traffic Manager profiles that can only have IPv4/IPv6 addresses as endpoints. When a query is received for this profile, all healthy endpoints are returned.
  • Subnet: Select Subnet traffic-routing method to map sets of end-user IP address ranges to a specific endpoint within a Traffic Manager profile. When a request is received, the endpoint returned will be the one mapped for that request’s source IP address.
Azure Traffic Manager
Credit: https://docs.microsoft.com


Microservices vs Monolithic Architecture

 Microservices vs Monolithic Architecture Here’s a clear side-by-side comparison between Microservices and Monolithic architectures — fro...